Every ENB preset page has the same comment under it: “are the screenshots vanilla or ENB?” That question is the sound of a preset losing a download. Presets live and die on trust, the visitor can’t try yours without a fifteen-step install, so the screenshots have to do the convincing, and a gallery of gorgeous afters convinces nobody who’s been burned before.
A draggable before and after settles it. Same scene, same weather, same second of the day, vanilla on one side and your preset on the other. Skyrim happens to be unusually good at producing exactly that pair, better than almost any other modded game, and most preset authors never use the advantage.
Skyrim’s unfair advantage: the toggle
ENBSeries can switch its effects off and back on while the game runs. By default that’s Shift+F12 (it’s a rebindable key combination in enblocal.ini if yours differs). No relaunch, no swapping folders, no load screen. The world keeps rendering the identical frame; only the preset comes and goes.
That turns a fair comparison from a chore into a ten-second job:
- Open the console and type
tfc 1. Free camera, time frozen. Nothing sways, nothing drifts. tmto hide the HUD. (The console stays open but invisible; type carefully and blind, or bind a screenshot key first. Ask me how I know.)- Frame the shot.
- Screenshot with the preset on. Shift+F12, screenshot again. Two frames, pixel-identical except for the ENB.
Shoot PNG, not JPEG: if you go through Steam, switch on “Save an uncompressed copy” in its screenshot settings first. JPEG smears exactly the things a preset adds, the grain, the dithering, the subtle grading, so compressing your evidence defeats the point of collecting it.
One more command earns its place: fw followed by a weather ID forces the sky. fw 81a gets you the standard clear weather, which matters because two shots under different cloud cover aren’t a comparison of your preset, they’re a comparison of Skyrim’s moods.
An ENB is five looks wearing one name
Here’s what makes ENB comparisons different from ordinary mod comparisons: the preset isn’t one effect. It reacts to time of day, weather, and interior lighting separately, and it can be spectacular at one and rough at another. Every preset author knows the dusk shot that sells the whole thing, and the flat noon shot that quietly doesn’t get posted.
Post the noon shot. A comparison set that proves a preset covers:
- A bright exterior at midday, the least flattering hour and the one people play in most
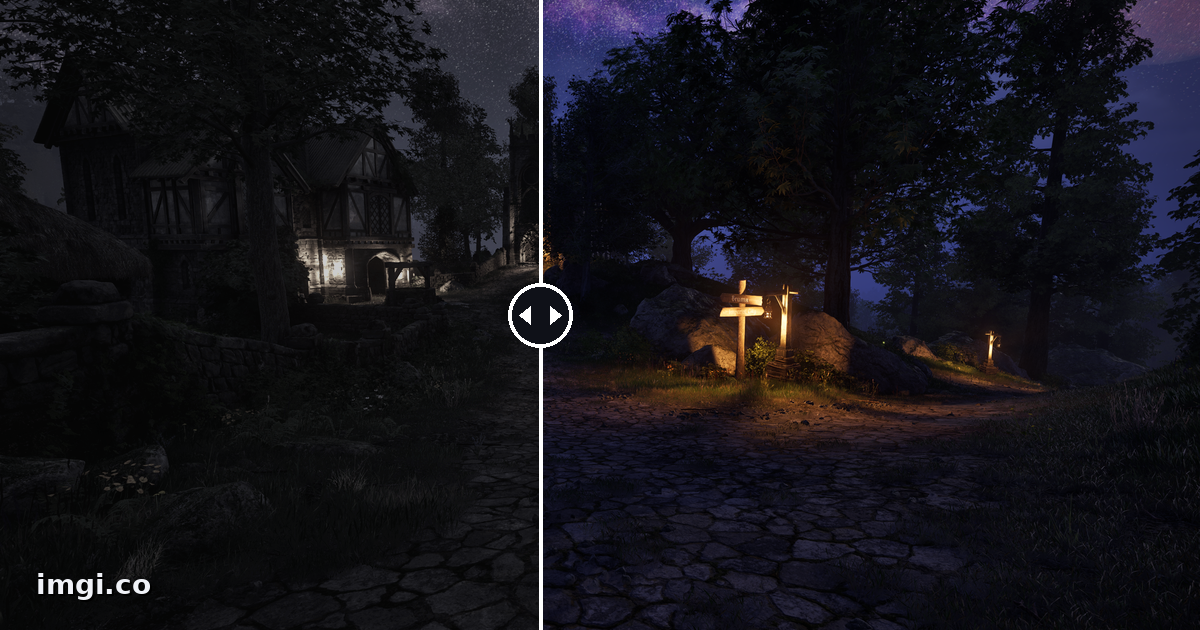
- A night exterior, where crushed blacks eat detail and cheap presets die
- A fire-lit interior, tavern or hall, where color grading either glows or goes orange
- Weather, rain or fog, where volumetrics and particle effects do their thing
- A face in conversation range, because skin tones are the first thing a LUT ruins
Five pairs, captured in maybe fifteen minutes with the toggle trick. That set answers the comment section before it opens.
Turning pairs into something people can drag
Upload each pair at imgi.co, free, no account. Label the sides Vanilla and the preset’s name, and put the conditions in the label or the comparison title (“clear noon, Whiterun plains”), since an unlabeled ENB comparison starts more arguments than it ends. Drag the handle once to confirm nothing drifted between shots; a two-pixel camera nudge reads as motion blur under a slider.
Here’s what this feels like to a viewer, this one’s from a shadow overhaul for Oblivion Remastered, same idea:
Group the five scenes into an album and you have one link that carries the whole case. That link goes in the Nexus description, the same place your gallery sits, plus a pinned comment for the people who scroll straight past prose. Nexus descriptions won’t run a live iframe, so pair the link with a GIF export of your best scene; the game mods guide covers that whole posting workflow.
If your preset leans on ReShade for part of its stack, ReShade can capture its own before/after of the same frame automatically; the ReShade screenshot guide has the ini setting.
Show the cost, not just the glow
An ENB is the most expensive visual mod most players will ever install. Hiding that costs more trust than admitting it. Two comparisons handle it:
Pair your showcase scene with its FPS numbers, vanilla and preset, in the description right next to the album link. If the preset costs 25 frames, the people who can afford 25 frames will still install it, and the people who can’t were going to uninstall it angrily anyway.
And if the preset has a performance mode, compare quality mode against performance mode directly, not just each against vanilla. That’s the comparison someone on a mid-range card actually needs, and almost nobody provides it. The graphics settings guide has the method for keeping those FPS claims fair.
What a still can’t show
Depth of field that breathes with focus, lens flares that move with the sun, temporal grain: some ENB features only exist across frames. A slider of two stills will undersell them, and pretending otherwise reads as dishonest to anyone who’s used ENBs before. Say it in the description and link a short clip for the motion stuff. The slider’s job is the 90% of a preset that is grading, lighting, shadows, and sky, and it does that job better than any video, because the viewer controls the reveal.
Your preset already looks good. Give people the vanilla frame to drag against, in the scenes that are hard, and the comment section stops asking whether the screenshots are real.